Adding interactive animations: Day 2
How to add an interactive magnetic animation using tailwind and framer-motion in NextJS
Welcome to Day 2 of making your websites look cool!👋
Today, we're building something super fun and magnetic
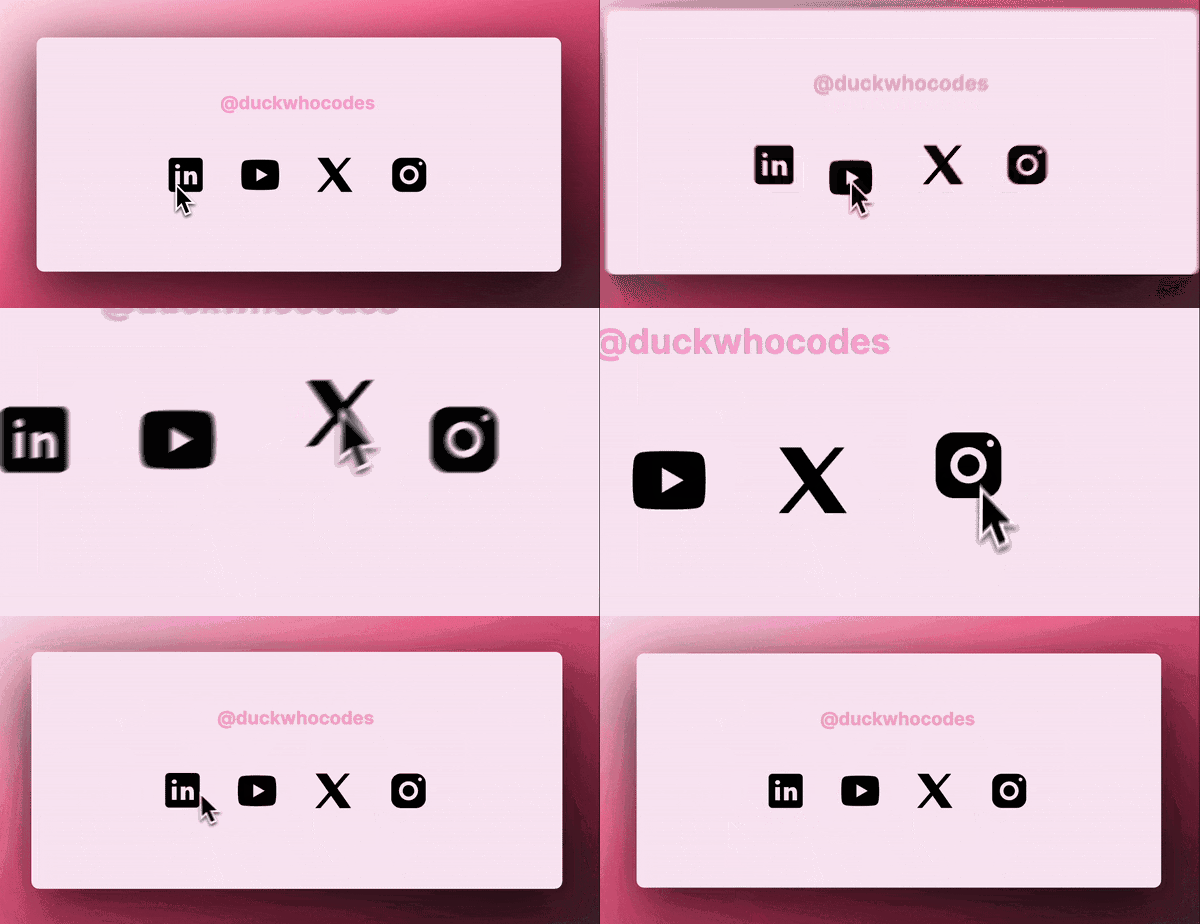
Here's a sneak peek of what we're about to cook up👩🍳

So basically, our images will gently gravitate towards our cursor as we hover across the screen.
Excited? Let's see how to add it!!💪
🛠️ Tools Used
Framer-motion: A (really good) library for creating complex UI animations in websites.
TailwindCSS: Using this we can add class-based custom designs, instead of writing custom CSS
and obviously, Next.js
Note: We won't really use much of Tailwind, so even if you are not familiar with it, you are good to go, just ignore the code in className .
🪜Steps
Step: 0 -> Installing dependencies⏳
Step: 1 ->Adding the code📟
Step: 2 ->Wrapping up🎁
Step 1: Installing dependencies
Init a Next.js project if you haven't already:
npx create-next-app@latest
These are the configs I selected👇🏻

To get Framer Motion onboard, simply run:
npm i framer-motion
The TailwindCSS setup comes out of the box for us NextJS users (if you selected), so we're ready to roll!🎲
But if you're using React or something, refer docs for installing tailwind🤓
Step 2: Adding the code
- First, we have our
page.tsxwith added plain ol' images frompublicfolder.
import Image from "next/image";

export default function Home() {
  return (
    <main className="flex min-h-screen flex-col items-center">
        <div className="flex gap-8">
              <Image src="/linkedin.svg" width={50} height={50} />
              <Image src="/youtube.svg" width={50} height={50} />
        </div>
    </main>
- Create a new file
framer.jsxin components folder ->components/framer.jsx
"use client";
import { useRef, useState } from 'react'
import { motion } from 'framer-motion';

export default function Framer({ children }) {

    // Reference to track the component's DOM element and position state for animation.
    const ref = useRef(null);
    const [position, setPosition] = useState({ x: 0, y: 0 });

    // Handles mouse movement, updating element's position relative to cursor.
    const handleMouse = (e) => {
        const { clientX, clientY } = e;
        const { height, width, left, top } = ref.current.getBoundingClientRect();
        const middleX = clientX - (left + width / 2)
        const middleY = clientY - (top + height / 2)
        setPosition({ x: middleX, y: middleY })
    }

    // Resets element's position when cursor leaves.
    const reset = () => {
        setPosition({ x: 0, y: 0 })
    }

    // Destructures the current position for the animation.
    const { x, y } = position;

    // Finally rendering our animated div with position based on mouse movement.
    return (
        <motion.div
            className='relative'
            ref={ref}
            onMouseMove={handleMouse}
            onMouseLeave={reset}
            animate={{ x, y }}
            transition={{ type: "spring", stiffness: 150, damping: 15, mass: 0.1 }}
        >
            {children}
        </motion.div>
    )
}
Don't forget to enable client-side rendering with "use client";
Step 3: Wrapping up
Import Framer from the components folder. Then, wrap the images in page.tsx in <Framer />
import Image from "next/image";
import Framer from "@/components/Framer";

export default function Home() {
  return (
    <main className="flex min-h-screen flex-col items-center">
      <div className="flex gap-8">
        <Framer>
          <Image src="/linkedin.svg"width={50} height={50} />
        </Framer>
        <Framer>
          <Image src="/youtube.svg"width={50} height={50} />
        </Framer>
      </div>
    </main>
  );
}
And just like that, we've added magnetic interactivity to our website!✨
I hope you had fun cooking with me <3

See you on the next one!!
This is a part of a short blog series for creating pretty websites💕
Checkout day 1 and leme know your feedback👇
❤️Follow me on Twitter to know more about me!
💕 Also subscribe to my Youtube Channel!

